How to Get Air Out of an RV Water Pump Fast
Picture turning on the RV faucet after a long drive only to hear sputtering and see water spray unevenly. Instead of a steady stream, air bursts through the line, leaving you frustrated.
This problem is often caused by trapped air inside the RV water pump system. Air pockets, also called air locks, block normal flow and strain the pump.
When left unresolved, air in the pump can reduce pressure, cause the pump to cycle continuously, and even damage the diaphragm. The result may be expensive repairs or premature pump failure.
According to the RV Industry Association, more than 11 million U.S. households own an RV, and reliable plumbing is one of the most critical features for travel comfort [RVIA
]. With so many RVs on the road, water system issues are a common concern.
A separate consumer survey found that over 35% of RV owners report plumbing problems each year, many related to air in the system or water pressure fluctuations [FamilyHandyman
]. These problems are preventable with routine checks and proper purging techniques.
Fortunately, learning how to get air out of an RV water pump is simple and requires only basic steps. By understanding the causes, symptoms, and solutions, owners can quickly restore water flow and protect the pump.
This guide explains why air becomes trapped, how to identify the warning signs, and the exact steps to purge it. With a few minutes of attention, every RV trip can have reliable water pressure and a properly functioning pump.
What Causes Air to Enter an RV Water Pump System
Air in an RV water pump system usually comes from leaks, changes in water sources, or plumbing maintenance. Even a small gap in fittings can allow air to enter and disrupt flow.
Switching from city water to the fresh tank can introduce air into the lines. This happens when the pump pulls in water after the system has been partially drained.
Winterizing is another common cause, as emptying and refilling lines often leaves pockets of trapped air. If not purged, these pockets create sputtering or loss of pressure.
Loose hose clamps, worn O-rings, or cracked fittings may also draw air into the pump. The suction side of the pump is especially sensitive to these small leaks.
An air lock, or large bubble trapped in the line, can completely block water flow. This forces the pump to cycle without building pressure, leading to noise and strain.
What is an air lock in RV plumbing?
It is a bubble of air trapped in the water line that prevents normal flow.
How does air get into the water pump?
It often enters through leaks, loose fittings, or after switching water sources.
Can valves cause air intrusion?
Yes, misaligned or faulty valves can introduce air into the plumbing system.
Does winterizing create air problems?
Yes, draining lines leaves air pockets that need to be purged when the RV is used again.
Is trapped air harmful to the pump?
Yes, it can cause cavitation, reduce water pressure, and shorten the pump’s life.
Symptoms of Air in the RV Water Pump or Lines
One of the most noticeable signs is sputtering faucets. Water comes out in bursts as air bubbles pass through the plumbing.
Another symptom is the pump cycling on and off repeatedly. The pump cannot maintain pressure because air pockets disrupt the flow.
Unusual gurgling or rattling noises are also common. These sounds indicate air is trapped somewhere in the system.
If the water stream pulses or feels inconsistent, the system likely has trapped air. This differs from a clog, which usually creates steady low flow.
Continuous pump operation without pressure buildup is another warning sign. This means the pump is trying to overcome an air lock.
Why does water sputter at the faucet?
Air bubbles interrupt the flow and escape through the faucet.
Why does the pump cycle repeatedly?
Air lowers pressure so the pump keeps trying to pressurize the lines.
Can strange noises mean air in the system?
Yes, gurgling or banging often signals trapped air.
Is low pressure always caused by air?
No, it could also be a clog or failing pump.
How can I tell air from a clog?
Air causes pulsing and sputtering, while clogs cause steady weak flow.
Preparations Before Purging Air
Before starting, ensure the fresh water tank has enough water. A low tank level allows the pump to draw in air instead of water.
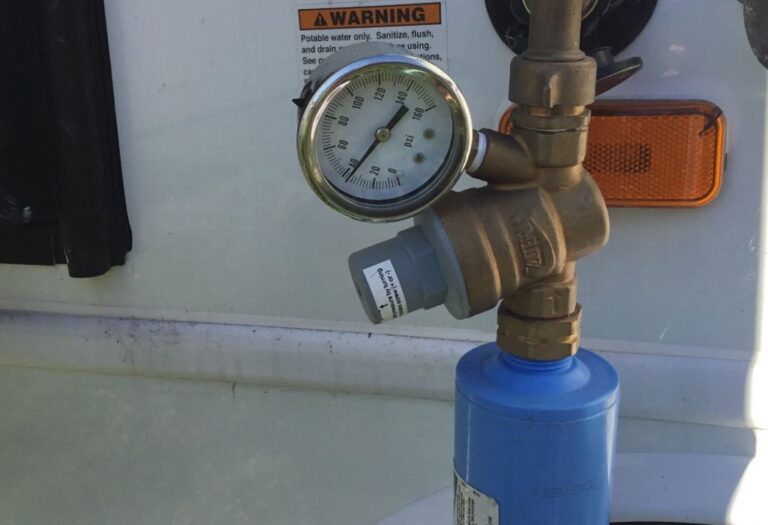
Turn off the water pump and open a faucet to release pressure. This prevents sudden sprays when working with connections.
Check hose clamps, fittings, and valves for looseness. Air often sneaks in through these small points on the suction side.
Gather simple tools such as towels, a bucket, and gloves. Some RVs may also include a purge valve that helps release trapped air.
Taking these precautions reduces mess and ensures a smoother purging process.
Should the pump be off when starting?
Yes, always turn it off before opening any part of the system.
Is the water level important?
Yes, a low level increases the chance of air intake.
What fittings should I inspect first?
Check hose clamps and joints near the pump inlet.
Do all systems have purge valves?
Not all, but some models include one to simplify bleeding.
Are special tools required?
Usually not, most fittings can be adjusted by hand.
Step-by-Step: How to Get Air Out of an RV Water Pump
Start by turning the pump on after filling the tank. Allow it to pressurize slowly while watching for leaks.
Open the faucet farthest from the pump and let water run. This helps push air out through the longest section of the plumbing.
Keep the faucet open until sputtering stops and water flows smoothly. Close it, then move to the next faucet closer to the pump.
Repeat the process for all faucets, including kitchen, bathroom, and outdoor connections. Each run clears additional air pockets.
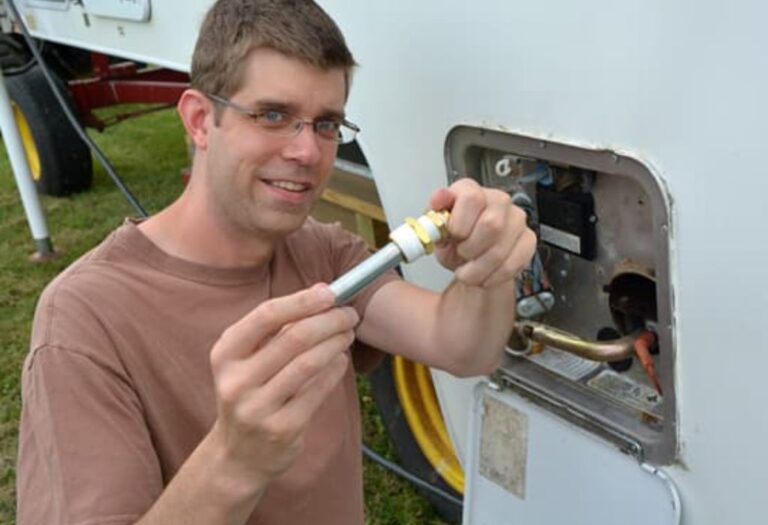
If the RV has a hot water heater, open the hot side faucets too. Air often collects in the heater and causes irregular flow.
Check pump behavior while purging. It should stop cycling once air is cleared and pressure is stable.
Inspect for leaks around fittings and hoses as the system runs. Fix any loose connections to prevent future air entry.
Finally, run all faucets for a short period to confirm steady flow everywhere. The system should now operate quietly with consistent pressure.
Which faucet should be opened first?
Start with the one farthest from the pump.
How long should each faucet run?
Until the flow is steady, usually one to two minutes.
What if air persists?
Repeat the purge or check for leaks that let air re-enter.
Can city water help purge air?
Yes, connecting to a pressurized supply can push air out quickly.
Will the pump stall during purging?
It may cycle, but it should stabilize once the air is gone.
Common Problems When Purging Doesn’t Work
Sometimes air remains even after purging. This usually means there is a continuous air leak.
Cracks in hoses or fittings allow air to re-enter. Replacing damaged parts is the only solution.
A faulty check valve can also let air back into the pump. This part should be inspected and replaced if necessary.
If the pump diaphragm is worn, it may draw in air internally. In this case, replacing the pump may be required.
Air may also get trapped in high points or loops in the plumbing. These need to be manually bled by opening lines at the highest locations.
Why does purging fail repeatedly?
Because air is entering faster than it can be expelled.
Can cracked hoses cause the issue?
Yes, cracks on the suction side allow constant air entry.
Is pump damage a possible cause?
Yes, worn seals or diaphragms can draw in air.
What about the hot water system?
It must also be purged since air collects in the heater.
Can plumbing loops trap air?
Yes, high or U-shaped lines often hold stubborn air pockets.
Maintenance Tips to Prevent Air in the Water Pump System
Always fill the fresh water tank before running the pump. This prevents dry runs that introduce air into the system.
Tighten hose clamps regularly since vibration can loosen them. A secure seal reduces the risk of suction leaks.
Replace worn O-rings and old hoses. Fresh components maintain airtight connections.
Keep purge valves and bleed screws functional. They make removing air much easier when problems occur.
During winterization, avoid leaving lines completely empty. A small water column reduces air lock formation.
Installing an accumulator tank helps smooth out pressure and absorbs air surges. This reduces stress on the pump and plumbing.
Adding a check valve or anti-siphon valve also prevents backflow. This protects the system from repeated air intrusion.
Does filling order matter?
Yes, fill the tank before running the pump.
Should clamps be inspected often?
Yes, vibration can loosen them during travel.
Is an accumulator useful?
Yes, it reduces pulsation and cushions the pump.
Can purge valves help?
Yes, they simplify the process of bleeding air.
Will a check valve prevent air leaks?
Yes, it blocks backflow and protects the pump inlet.
When to Call a Professional or Replace Components
If purging does not restore normal flow, professional help may be needed. Persistent air indicates a deeper issue.
Visible damage such as cracked housings or split hoses requires immediate replacement. Ignoring them risks water damage inside the RV.
When the pump cannot prime or fails to sustain pressure, it may need replacement. Internal wear is usually not repairable.
Upgrading venting or plumbing components is also an option. Higher quality fittings and pumps reduce long-term problems.
When is professional service required?
If leaks or pump damage cannot be identified.
Should damaged hoses be repaired?
No, they should be replaced for safety.
When to replace the pump?
If it fails to prime or hold pressure even after purging.
Is upgrading venting worth it?
Yes, it helps prevent recurring air issues.
Can air problems cause pump failure?
Yes, long-term cavitation shortens pump life significantly.
Conclusion
Air in an RV water pump system can cause sputtering faucets, noisy operation, and costly repairs. Knowing how to get air out of an RV water pump ensures reliable performance.
By understanding the causes, identifying symptoms, and following purging steps, RV owners can keep water flowing smoothly. Regular maintenance and quick repairs prevent small issues from becoming major failures.
Make air purging part of your routine checks and enjoy consistent water pressure on every trip. A few minutes of attention now will keep the pump and plumbing system protected for years to come.
I’m David R. Coleman, the founder, lead writer, and lifelong tool enthusiast behind GarageToolPro.com. With years of experience in automotive repair, woodworking, and home DIY projects, I created this platform to share practical tips, detailed tool reviews, and step-by-step guides that help mechanics, hobbyists, and homeowners get the job done right the first time.